Showing posts with label preston blair. Show all posts

Friday, April 27, 2007

Animation School Lesson 5 - Line of Action, Silhouettes - Part One

Here are the exercises from the Preston Blair book (I will post the Tinkerbell, Wart, and a Clampett drawing from John K's site later, since I haven't scanned them yet). As I mentioned in my last post, this was my introduction to line of action. I'd read somewhere that animators used a red pencil for line of action and blue pencil for the construction, so I used the red pencil for the first couple and ended up dropping it since it was too distracting and covered up facial details.

Incidentally, I got a nice comment from Jack Ruttan when I was halfway through this lesson. He suggested that my lines could be livelier, and after I thought about it for a while, I think I understood what he was saying. I had been trying to carefully trace my construction lines so I didn't mess up my drawings, but artists' lines are usually done quickly and have more flow to them. I have been trying to do that, and as he says, it will come with more practice. Thanks, Jack.


ASIFA-Hollywood Animation Archive: Meta: The $100,000 Animation Drawing Course- Lesson 5

Animation School Lesson 5 - Understanding the Line of Action

One thing I've noticed about Preston Blair's book is that it's big on illustrative examples, but is weak when it comes to details about why something is done. John K and Stephen Worth usually provide a bit more details, but I still like to look around to get other perspectives. I don't mean any disrespect, but I think they sometimes forget that some members of their audience are not professional animators.

I'd never worked with Line of Action before, and all I got from John K's lesson was that it helps your poses "read" by making them clear and understandable, and gives them a distinct non-ambiguous direction. They can be obvious and exaggerated, and details follow the line of action and don't go in opposite directions.

Well, that's fine, but again, this was my first introduction to line of action. Nothing I found online could tell me exactly how to draw one. I gather from the examples that it usually follows the character's body, and you can infer from some of the details in the examples where it's supposed to go, but should it follow the head? The hands? Can a pose have more than one line of action? I'm thinking specifically of the second Clampett drawing and the drawing of Wart. Does the line of action on the cat with the lightbulb above his head go through his head or his hand?

Hoping to find some insight, I found some good information on the always-great Temple of the Seven Camels and Animation Apprentice.

From Temple of the Seven Camels, "More on Line of Action":
"A good Line of Action... helps organize what you're trying to say into one thought. Any drawing should only try to say one thing."
"Always keep the line-of-action simple. I think a gesture, in order to have any kind of punch to it, needs to be based on either a straight line, a curve, or an "S" curve. Those three types of lines have direction and force to them. Anything else, like a zigzag or a more complicated series of curves, loses its ability to convey an action or direction."
"If you push a line of action too far, or in the wrong way, you can sacrifice the structure of what's underneath and you're left with something that feels like it's made out of jelly with no skeleton - that's not good."


From Animation Apprentice, "Learning Line of Action":
"You have a very strong forward slanting LoA (line of action), and you know the character is really determined and single minded. You have a strongly backward slanting LoA, or better yet a curve, and you know the character is probably desperately trying to get away from whatever is in front of it. And the S-Curve line of action is even more fun - it can show two different intents, pulling the character in different directions."

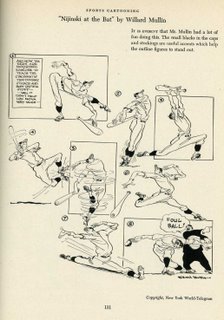
Temple of the Seven Golden Camels also has a really great example from the book "The Complete Guide to Drawing, Illustration, Cartooning and Painting" by Willard Mullins. The baseball player page provides several examples where the line of action is really easy to see, even for a rookie like me.


In Temple of the Seven Golden Camels' "Simplicity, Appeal, Line of Action, a lot of blabbity blah and Jordi Bernet", Mark gives some examples from the artist Jordi Bernet. "Directional drawing is easier when you draw SIMPLY. One of the keys to really directional drawing is to make EVERY line on the figure 'point' the way you want it to. Nothing on the figure fights the directional line." I really appreciated seeing how the lines in the character's details, from facial lines to clothing lines to the direction of the character's gaze, can be used to enhance and support the line of action.

I didn't intend for this to be a rant, and again, I mean no disrespect to Preston Blair, John K or Stephen Worth. Blair shows us what line of action means in the form of illustrations, John K explains why it should be done, but I was still left wondering how it can be done when you're not just copying from Blair's book. I think I understand it better now, but if anyone out there has any insights, I would really appreciate it if you'd leave them in the comments.

I'll post my drawings in another post and will shut up now.

ASIFA-Hollywood Animation Archive: Meta: The $100,000 Animation Drawing Course- Lesson 5

Saturday, April 21, 2007

Animation School Lesson 4 - 2 legged characters-full body

Here is lesson four from Preston Blair's book (Why did John K choose to skip "Body Built from Rounded or Circular Forms" and "The Skeleton Foundation"? I guess I'll have to go back and do them myself, because Tom and Jerry are my favorites).

This lesson was an extension of what we learned in the first two lessons - that basic forms and construction lines need to be drawn first, followed by basic forms and then details that should wrap around the form to give it a three-dimensional feel.

I hope you like these. I haven't done the Photoshop comparison because I don't have Photoshop on my computer, but I think they're pretty close, so I'm happy with them.

Please let me know if there are any areas I should improve upon!


ASIFA-Hollywood Animation Archive: Meta: The $100,000 Animation Drawing Course- Lesson 4

Thursday, March 22, 2007

Lesson One: Construction of the Head - Rodents

I actually like how most of these look, and I think the confidence I feel is starting to come through in the drawings. For the most part (except the first one), I think they match Preston Blair's drawings pretty well, but you can always see some differences.


Lesson One: Construction of the Head - Horizontal Egg Head

I think I did much better on the vertical egg head than this one. Trying to get the shape of the egg outline right when looking at the egg in 3/4 profile was tricky, and I don't think I did very well.


Lesson One: Construction of the Head - Elephant

This one was fun, because I liked the design of the elephant, and it was challenging to figure out how far his trunk and ears stuck out.


Lesson One: Construction of the Head - Bulldog

This one was hard. The dog's head has so many things that bulge out, like the jowls, the teeth, and the eyebrows, that made it difficult. I don't think I did so well with this one, and realized only on the later ones that the jowls should wrap around his head. It was also hard to picture what his ears would look like from below.


Lesson One: Construction of the Head - Barney Bear

At this point, I abandoned the graphite pencil, because I was much happier with the non-photo blue pencil drawings before I did the final outline in graphite. I thought it made them look much worse in general, and I think that from this point on, the drawings look better.

I found a model sheet on Goober Sleave and realized that this character was Barney Bear. I thought he looked familiar. If I'd seen these before doing my drawings, that might've helped me envision him better, but I guess I did OK. Still, I had a little trouble getting the shape of his head right, because I was starting to realize that even though these are all based on the vertical egg shape, they aren't exactly egg-shaped - Barney's head is certainly rounder than an egg.


Lesson One: Construction of the Head - Old Lady

This one was fun, but it was difficult mostly because I couldn't for the life of me figure out what the back of her head looked like. Was that hair on top of her head? A hat? A hair net? For some reason, I first pictured the hair on back of her head to be flat, then more curly in the later drawings. I also couldn't figure out what was up with her earrings - where did her ear end and where did the earring begin? And just how far out did her nose stick?


Lesson One: Construction of the Head - Moustache Man

Here's the first character to draw "in every position using the above egg as a guide". This to me seemed to be the most important part of this lesson. You are given a character and you have to envision it in 3-D. You need to know what the back of his head looks like, how his hat sits on his head, how far out his nose sticks, where his moustache separates from his face - it's hard! I had the most difficult time envisioning what the hat would look like from different angles. I even took a little hat and put it on one of my sons' toys to try to picture it.


Lesson One: Construction of the Head - The Egg

I'd never drawn an egg before. It took me several tries before I started to get the shape right - the first examples of the egg drawing I think are either too narrow or too fat. I'd never worked with construction lines before, but it really does help with the placement of features on the drawing.


Lesson One: Construction of the Head - Bear

I've never drawn animation-style characters before. Whenever I've drawn in the past, it's been more "realistic" stuff, like the Karloff sketches. And since I've never had any art training, I've never actually followed any principles like the ones Preston Blair describes. They sure make a lot of sense - they not only allow you to place features in the correct spots onto a head, but they also allow you to see what is a 2-dimensional character in 3-D terms.

It's taken me a while to get through this first lesson, but that's because I'm following John K's and Preston Blair's instructions quite literally. I intend to learn from this course, not just try out a couple of sketches. What surprises me is that I have found very few people doing these exercises actually follow the instructions on PAGE ONE of Preston Blair's book: "draw these heads in every position using the above egg as a guide". To me, this was one of the most challenging parts of this exercise. You have to take a drawing of a character and then imagine it in 3-D. This means that you need to envision it so that you can draw it from 10 different angles. So, from the initial drawing, you have to know things like what the moustache man's hat looks like from above, how far out his moustache goes, and where does it disconnect from his upper lip. You have to know what the old lady's nose looks like from above, below, and the side, and have an idea just what her crazy hair looks like from different angles. This stuff is hard, and I couldn't always get it right, but I tried.

Anyway, here is the first part - the bear.


It'd been a while since I'd actually drawn anything, and I could feel my confidence growing with each bear. The first ones are more sketchy and aren't very good, but by the end, I was starting to get the hang of it. I don't believe any of these exactly match Preston Blair's, but for me, this was a warm-up.

The other parts of this exercise are being posted separately.

ASIFA-Hollywood Animation Archive: Meta: The $100,000 Animation Drawing Course- Lesson 1